


Just register for the free trial below and we will send you everything you need to evaluate QuickBooks Online including 30-day access, the full 76-page QuickBooks Online Guide (details everything that you can do in the software) plus the video training library. Free end-to-end consultation and support are included so if you need any help along the way, just let us know!


Partial payments occur when customers make payments that only cover a portion of the total amount due on an invoice. This can happen for various reasons – perhaps the customer is fulfilling the payment in installments, or they’ve provided a down payment for a larger project. Whatever the case, accurately recording these partial payments is crucial to maintaining an accurate financial record.
In this article, we’ll cover how to enter partial payments in QuickBooks Online. We’ll also share some tips and challenges that you may encounter when recording partial payments in QuickBooks.
How to Enter Partial Payments in QuickBooks
Step 1: Open the Customer Center
Launch QuickBooks and navigate to the Customer Center by clicking on Customers under Customers & leads in the left navigation menu.
Step 2: Locate the Customer
Find the customer who made the partial payment in the list. Click on the Receive payment button at the far right side of the customer name.
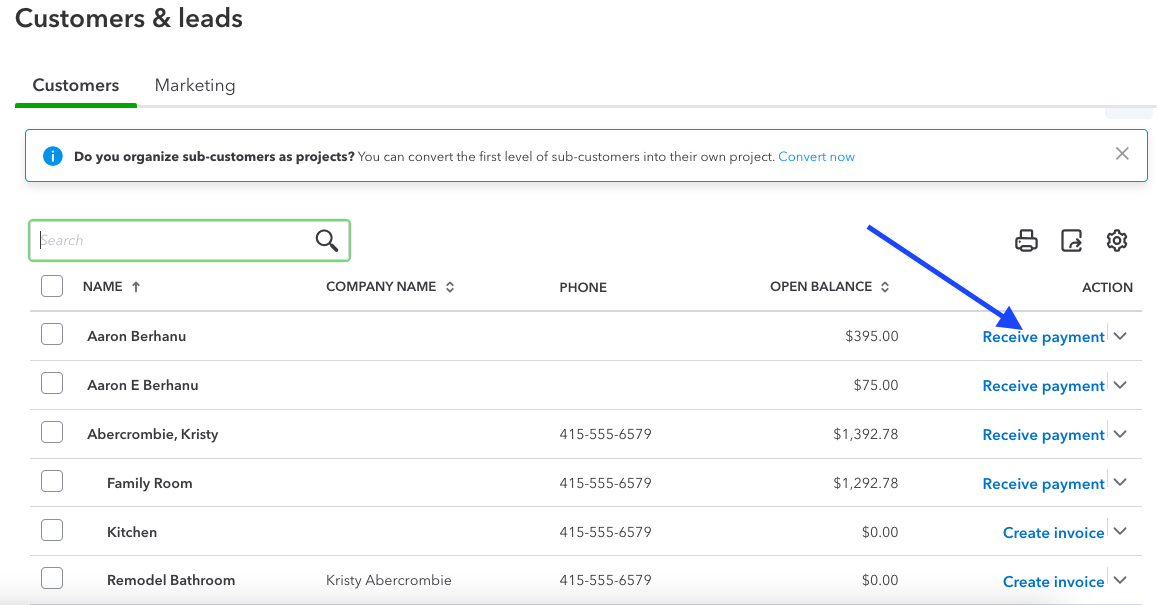
Click on Receive payment next to the customer’s name
Step 3: Enter Payment Amount
In the “Receive Payments” window, you’ll see the outstanding balance for the invoice. Enter the partial payment amount in the “Amount Received” field.
Step 4: Specify Payment Date
Indicate the date on which the partial payment was received in the “Payment date” field.
Step 5: Indicate the Payment Method
Choose the payment method used by the customer – cash, check, credit card, etc. If applicable, enter additional details like check numbers or reference numbers.
Step 6: Apply Payment
In the “Outstanding Transactions” section, you’ll see the invoice for which you’re recording the payment. QuickBooks might automatically apply the payment to the oldest invoice, but you can change this if needed. To do so, click on the checkmark next to the invoice to toggle it on or off.
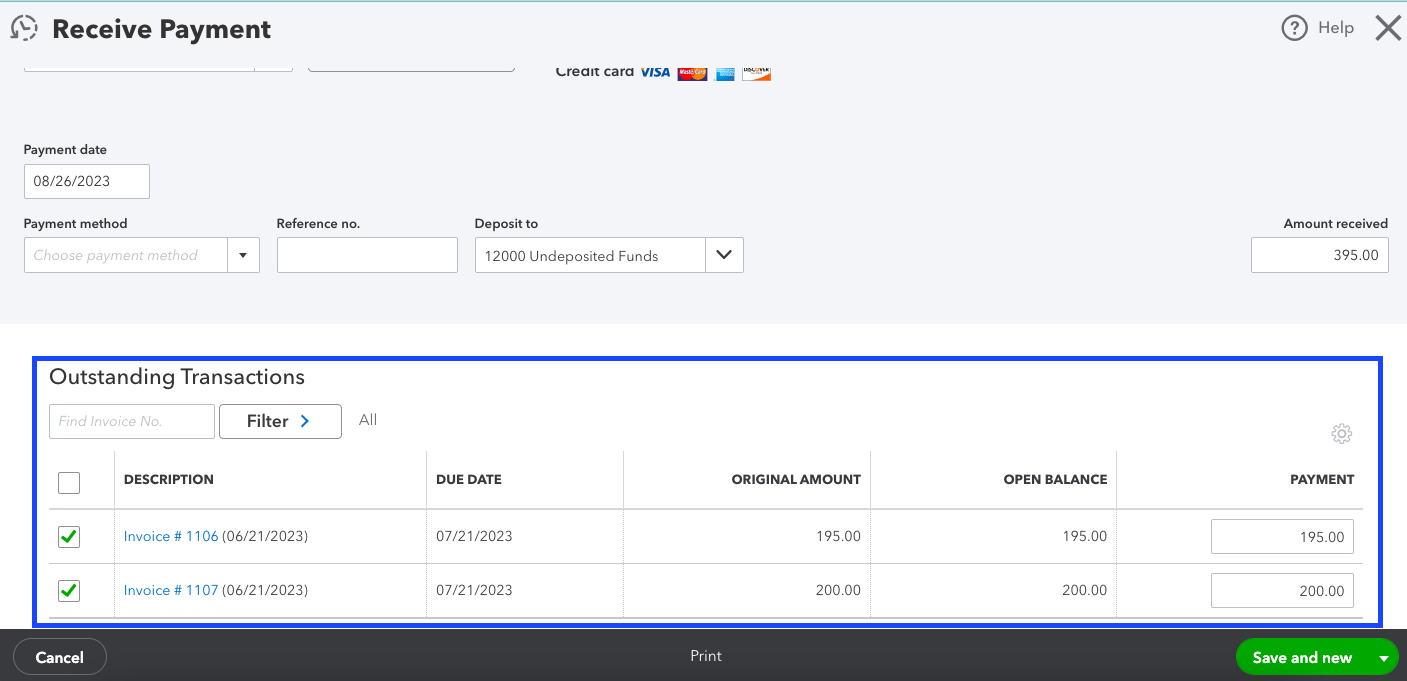
Receive Payment screen in QuickBooks highlighting the outstanding transactions setion
Step 7: Save
After ensuring that all the information is accurate, click the “Save & Close” dropdown under the Save and new button to save the partial payment entry.
Step 8: Review
Double-check your entries in the invoice and payment screens to make sure everything is recorded correctly.
Benefits of Tracking Partial Payments
Properly tracking partial payments in QuickBooks brings several advantages to businesses:
Accurate Financial Statements
By entering partial payments, your financial statements will accurately reflect the state of your accounts receivable. This ensures that you have a clear understanding of the outstanding balances and can make informed financial decisions.
Improved Customer Relationships
Recording partial payments allows for transparency in customer transactions. Providing customers with accurate records of their payments demonstrates professionalism and fosters trust.
Efficient Reconciliation
Clear documentation of partial payments simplifies the reconciliation process. You can easily match payments to invoices, reducing errors and saving time during the reconciliation process.
Projection and Planning
Accurate tracking of partial payments provides insights into future cash flows. Businesses can project how much revenue they can expect from outstanding invoices and plan accordingly.
Potential Challenges and Tips
While QuickBooks streamlines the process of entering partial payments, there are a few challenges you might encounter:
Multiple Invoices
If a customer is making partial payments for multiple invoices, ensure that you apply the payments correctly to each invoice. QuickBooks allows you to allocate payments to specific invoices manually.
Overpayments
Sometimes, customers might accidentally overpay while making a partial payment. In such cases, QuickBooks lets you handle the overpayment by either applying it as a credit to their account or issuing a refund.
Reconciliation
Regularly reconcile your accounts to ensure that all payments and invoices are accurately recorded. QuickBooks’ reconciliation feature helps identify discrepancies between your records and bank statements.
Wrap Up
Entering partial payments from customers in QuickBooks is a crucial task to maintain accurate financial records. By following the step-by-step guide outlined in this article, businesses can ensure that their accounting remains precise and transparent.

Why QuickBooks Online Is a Game-Changer for Small Business Accounting
For small business owners, managing finances can feel like a constant balancing act, trying to stay on...

Can I Use the QuickBooks Online Test Drive to Test integrations?
QuickBooks Online can have a learning curve, especially for new users or businesses trying to integrate...

How Can I Contact QuickBooks Online Support?
Navigating QuickBooks Online can sometimes be challenging, especially when issues arise that require...

How Much Does Each QuickBooks Online Plan Cost per Month?
QuickBooks Online offers a range of subscription plans designed to meet the diverse needs of businesses...

QuickBooks Online Advanced vs Enterprise: A Detailed Comparison
QuickBooks offers two robust solutions for businesses ready to step up from basic accounting software:...

QuickBooks Online vs Desktop: Differences & When to Use Each
QuickBooks, a popular accounting software, offers two main versions: QuickBooks Online and QuickBooks...

Is There a Specific Time of the Month that's Best for Migrating to QuickBooks Online?
Migrating to QuickBooks Online can be a transformative step for your business, offering improved accessibility,...

Can QuickBooks Online Integrate with My Point-of-Sale (POS) System?
Efficient financial management requires seamless integration between your Point-of-Sale (POS) system...

Why Should I Migrate from QuickBooks Self-Employed to QuickBooks Online?
Migrating from QuickBooks Self-Employed (QBSE) to QuickBooks Online (QBO) can significantly enhance your...

How Does QuickBooks Online Handle Sales Taxes?
Managing sales tax is a crucial aspect of running a business. It can be complex and time-consuming, but...

Can I Import My Data From Another Accounting Software to QuickBooks Online?
Transitioning to a new accounting software can seem daunting, especially when considering the need to...

How Does QuickBooks Online Help With Project Management for Marketing Agencies?
QuickBooks Online offers a suite of tools that can significantly enhance project management for marketing...