


Just register for the free trial below and we will send you everything you need to evaluate QuickBooks Online including 30-day access, the full 76-page QuickBooks Online Guide (details everything that you can do in the software) plus the video training library. Free end-to-end consultation and support are included so if you need any help along the way, just let us know!


One of QuickBooks Online’s strongest features is its invoicing tool. It allows you to easily create invoices and customize them based on your brand and unique preferences. After creating the invoice, you can send it directly from within QuickBooks and track it until it’s paid.
In this article, we’ll cover how to create and send invoices in QuickBooks Online to help you better manage your finances, especially your accounts receivable (A/R).
Step 1: Access QuickBooks Online. Start by logging into your QuickBooks Online account.
Step 2: Navigate to the invoice creation form. Once you’re logged in, you’ll be directed to the QuickBooks Online dashboard. Locate and click on Sales in the left navigation menu and then select Invoices from the dropdown list. From the Invoices tab, click on the Create invoice button to display the invoice creation form.
Alternatively, you can instantly head to the invoice creation form by clicking on +New on your dashboard and then selecting Invoice under the Customers column.
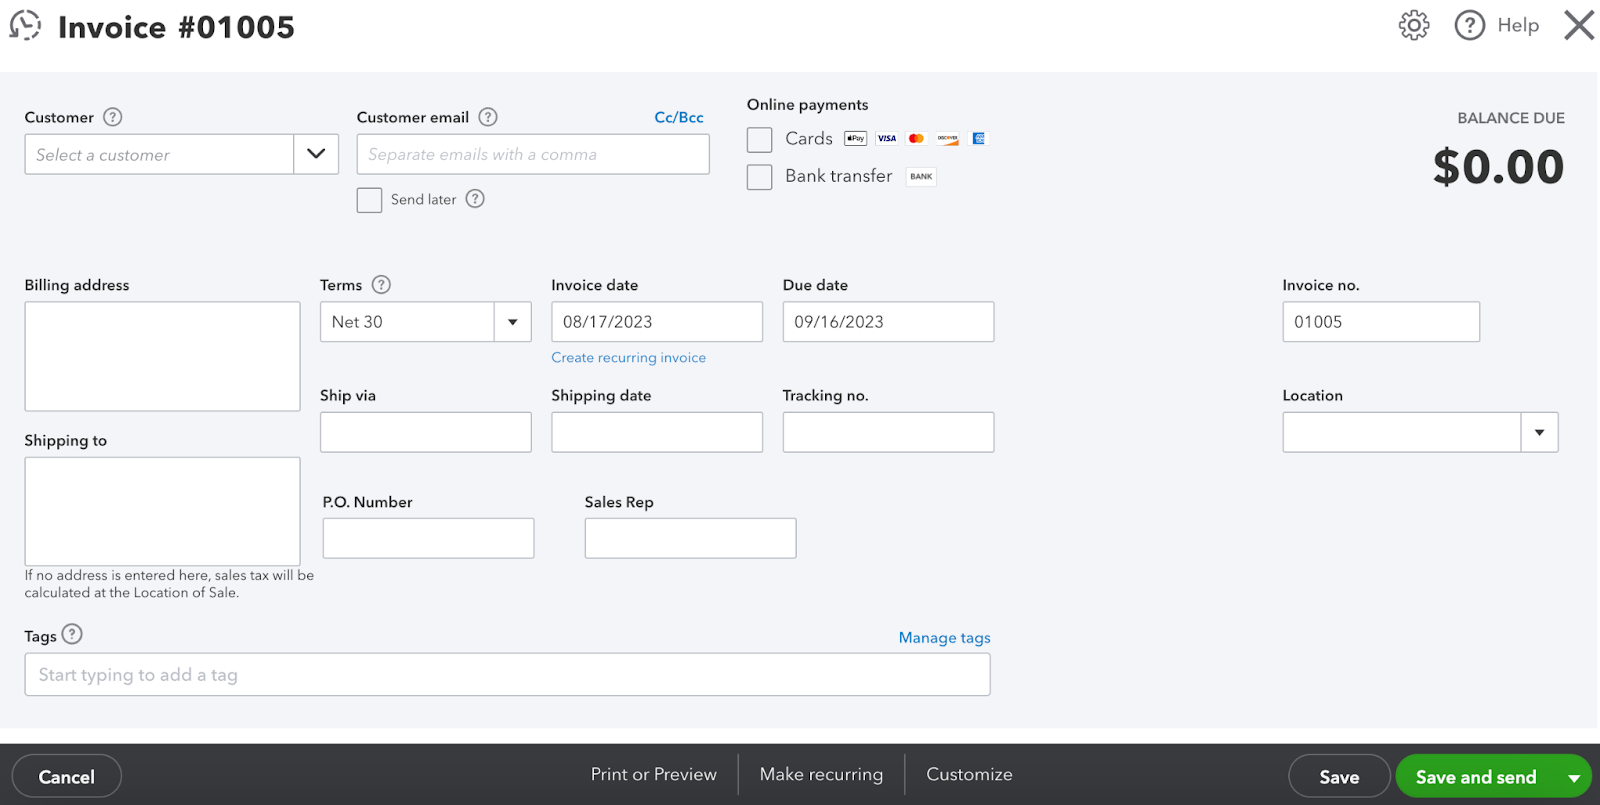
Invoicing form in QuickBooks Online
Step 3: Create the invoice: Complete the invoice entry form by providing the required details, including the following:
- Customer: Choose the customer or client for whom you’re creating the invoice. You can select an existing customer from your contacts or add a new one.
- Invoice Date: Enter the date you’re generating the invoice. This is usually the current date.
- Due Date: Specify the date by which the payment should be made. This helps manage your receivables and provides clarity to your clients.
- Invoice Number: Assign a unique invoice number. QuickBooks often automatically generates a sequential number, but you can customize it as needed.
- Itemization: Add the products or services you’re billing for. QuickBooks allows you to create a list of items for easy selection. If you’re invoicing for a new item, you can add it directly from the invoice.
- Description and Quantity: Provide a brief description of each item or service, along with the quantity being billed.
- Rate and Amount: Enter the unit price or rate for each item. QuickBooks will automatically calculate the total amount based on the quantity and rate.
Step 4: Customize the invoice. QuickBooks Online enables you to customize your invoices with various fields, such as adding a memo, terms, and a personalized message to the client. You can add your company logo, change colors, and select a template that aligns with your brand identity.
Step 5: Preview and send the invoice. Before sending, review the invoice to ensure accuracy. Double-check the items, amounts, and any additional information. Once you’re satisfied, you can choose to save the invoice as a draft, print it, or send it via email. QuickBooks provides an option to attach the invoice as a PDF.

Email an invoice from within QuickBooks Online
Step 6: Track the invoice status. After sending the invoice, you can track its status on the dashboard. QuickBooks Online provides insights into whether the invoice has been viewed, paid, or is overdue.
Step 7: Record the payment. When your client makes a payment, record it in QuickBooks by clicking on the +New button and then selecting Receive Payment under Customer. Apply the payment to the corresponding invoice to keep your records accurate.
Smart tip: To help you better manage your A/R workflows, we recommend setting up invoice approval workflows, which is available in QuickBooks Online Advanced. Learn more about setting up invoice approval workflows.
QuickBooks Online’s easy invoicing tool and excellent customization options make it a valuable tool for businesses of all sizes, helping you stay on top of your invoicing process and ensuring a steady flow of income.

Why QuickBooks Online Is a Game-Changer for Small Business Accounting
For small business owners, managing finances can feel like a constant balancing act, trying to stay on...

Can I Use the QuickBooks Online Test Drive to Test integrations?
QuickBooks Online can have a learning curve, especially for new users or businesses trying to integrate...

How Can I Contact QuickBooks Online Support?
Navigating QuickBooks Online can sometimes be challenging, especially when issues arise that require...

How Much Does Each QuickBooks Online Plan Cost per Month?
QuickBooks Online offers a range of subscription plans designed to meet the diverse needs of businesses...

QuickBooks Online Advanced vs Enterprise: A Detailed Comparison
QuickBooks offers two robust solutions for businesses ready to step up from basic accounting software:...

QuickBooks Online vs Desktop: Differences & When to Use Each
QuickBooks, a popular accounting software, offers two main versions: QuickBooks Online and QuickBooks...

Is There a Specific Time of the Month that's Best for Migrating to QuickBooks Online?
Migrating to QuickBooks Online can be a transformative step for your business, offering improved accessibility,...

Can QuickBooks Online Integrate with My Point-of-Sale (POS) System?
Efficient financial management requires seamless integration between your Point-of-Sale (POS) system...

Why Should I Migrate from QuickBooks Self-Employed to QuickBooks Online?
Migrating from QuickBooks Self-Employed (QBSE) to QuickBooks Online (QBO) can significantly enhance your...

How Does QuickBooks Online Handle Sales Taxes?
Managing sales tax is a crucial aspect of running a business. It can be complex and time-consuming, but...

Can I Import My Data From Another Accounting Software to QuickBooks Online?
Transitioning to a new accounting software can seem daunting, especially when considering the need to...

How Does QuickBooks Online Help With Project Management for Marketing Agencies?
QuickBooks Online offers a suite of tools that can significantly enhance project management for marketing...