


Just register for the free trial below and we will send you everything you need to evaluate QuickBooks Online including 30-day access, the full 76-page QuickBooks Online Guide (details everything that you can do in the software) plus the video training library. Free end-to-end consultation and support are included so if you need any help along the way, just let us know!


Whether you need to customize what fields should appear in your expense and purchase forms or you want to add custom fields to your purchase orders, you need to know how to efficiently customize your expense settings in QuickBooks Online. By customizing your expense settings, you can keep a closer eye on where your money is going and easily analyze your spending patterns. That’s why in this guide, we’ll show you how to customize expense settings in QuickBooks Online.
Step 1: Navigate to the Expenses Section
- Click on the cogwheel to access the settings menu, and then select select Account and settings. A new window will appear, displaying various tabs on the left. Click on the Expenses tab to reveal the three categories of expense settings: bills and expenses, purchase orders (POs), and messages.

Navigate to Expenses in QuickBooks Online
Step 2: Customize Bills and Expenses
- Let’s start by customizing your bills and expenses settings. Click anywhere in the “Bills and expenses” section. The “Bills and expenses” section contains several important fields that you can adjust to meet your specific business needs. Here’s an overview of these fields:
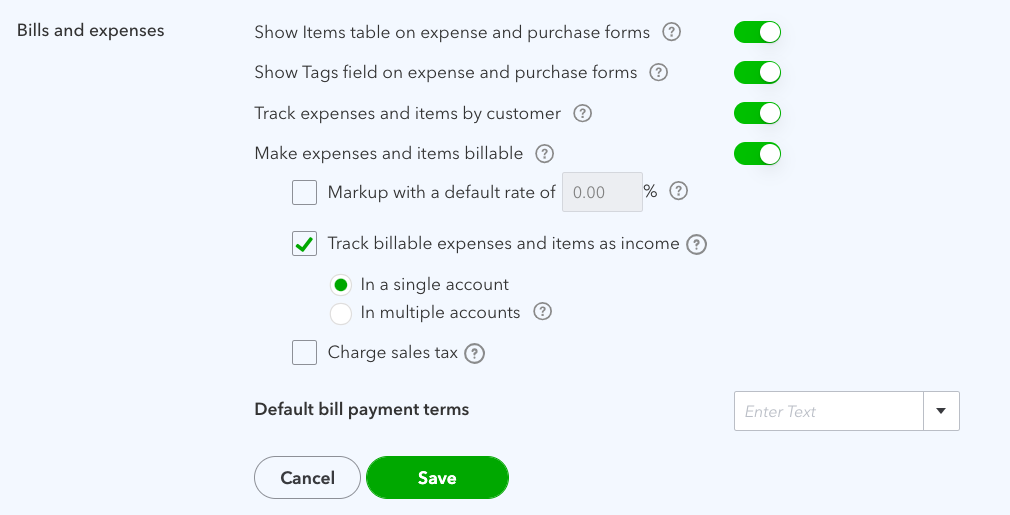
Bills and expenses settings in QuickBooks
- Display items table on expense and purchase forms: Enable this setting to assign expenses and purchases to “items” instead of directly to expense accounts.
- Show Tags fields on expense and purchase forms: Use tags to categorize expenses in a way that isn’t covered by other fields. For example, you might use tags to categorize expenses by department, project, or location.
- Track expenses and items by customer: Turn this setting on if you want to assign expenses and items to specific customers. This is useful if you bill customers for expenses incurred on their behalf.
- Make expenses and items billable: Activate this setting when you want to charge customers for expenses you incurred on their behalf. This is handy for consultants or service providers.
- Markup with a default rate of: If you’re charging expenses to customers, you can choose a default markup rate here. Leave it unchecked if you want to bill expenses at the actual cost.
- Track billable expenses as income: Choose how you want to handle billable expenses. If you check this option, you can decide whether to track all billable expenses in a single income account or multiple accounts.
- Charge sales tax: Enable this option if you’re required to collect sales tax on billable expenses. Invoices for billable expenses will include a field for sales tax.
- Default bill payment terms: Set up default payment terms that apply to bills with no specific payment terms from vendors. This helps you manage your payables effectively.
- Once you have customized your options” click the green Save button to apply the changes.
Step 3: Customize PO Settings
- Click on “Purchase orders” to access the various options available for customizing your purchase orders (POs). Here’s an overview of the fields in the “Purchase orders” section:
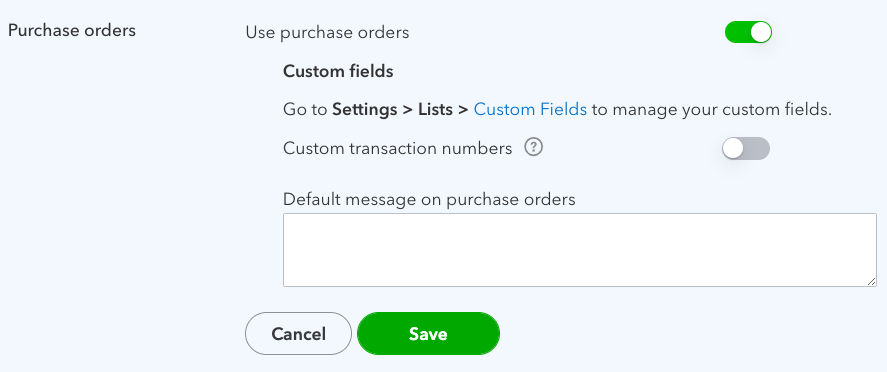
Customizing PO settings in QuickBooks Online
- Use purchase orders: Activate this option to enable the use of purchase orders in QuickBooks. This feature allows you to generate and send POs to vendors.
- Custom fields: You can add up to three custom fields to print on your POs. This is beneficial if your vendors require specific information not included in QuickBooks POs.
- Custom transaction numbers: You can manually input PO numbers when creating POs by checking this option. This is useful if you want to match your POs to a vendor’s system.
- Default message on purchase orders: Provide a default message to be printed on all POs. You can customize this message when creating a PO.
- Click the green Save button to save your changes.
Step 4: Customize the PO Email
- The last section of expense settings allows you to design a default email message to accompany POs sent to vendors. Click on Messages to get started.
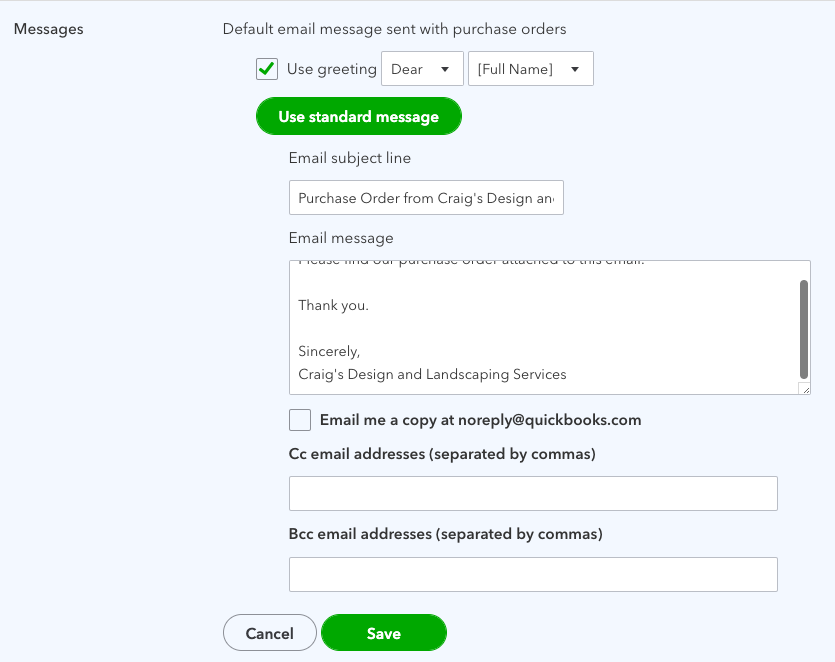
Customizing the PO email in QuickBooks Online
- Customize the greeting, subject line, and message you want to include in the emails sent with your POs. You can always make changes to the email message when sending a specific PO. Once you’ve finished customizing your PO email, click the green Save button to apply your changes.
Wrap Up
By following these steps, you can easily customize your expense settings in QuickBooks Online to better align the platform with your specific business requirements. This customization will help you streamline expense tracking, improve accuracy, and ensure that your financial data meets your unique business needs.

Why QuickBooks Online Is a Game-Changer for Small Business Accounting
For small business owners, managing finances can feel like a constant balancing act, trying to stay on...

Can I Use the QuickBooks Online Test Drive to Test integrations?
QuickBooks Online can have a learning curve, especially for new users or businesses trying to integrate...

How Can I Contact QuickBooks Online Support?
Navigating QuickBooks Online can sometimes be challenging, especially when issues arise that require...

How Much Does Each QuickBooks Online Plan Cost per Month?
QuickBooks Online offers a range of subscription plans designed to meet the diverse needs of businesses...

QuickBooks Online Advanced vs Enterprise: A Detailed Comparison
QuickBooks offers two robust solutions for businesses ready to step up from basic accounting software:...

QuickBooks Online vs Desktop: Differences & When to Use Each
QuickBooks, a popular accounting software, offers two main versions: QuickBooks Online and QuickBooks...

Is There a Specific Time of the Month that's Best for Migrating to QuickBooks Online?
Migrating to QuickBooks Online can be a transformative step for your business, offering improved accessibility,...

Can QuickBooks Online Integrate with My Point-of-Sale (POS) System?
Efficient financial management requires seamless integration between your Point-of-Sale (POS) system...

Why Should I Migrate from QuickBooks Self-Employed to QuickBooks Online?
Migrating from QuickBooks Self-Employed (QBSE) to QuickBooks Online (QBO) can significantly enhance your...

How Does QuickBooks Online Handle Sales Taxes?
Managing sales tax is a crucial aspect of running a business. It can be complex and time-consuming, but...

Can I Import My Data From Another Accounting Software to QuickBooks Online?
Transitioning to a new accounting software can seem daunting, especially when considering the need to...

How Does QuickBooks Online Help With Project Management for Marketing Agencies?
QuickBooks Online offers a suite of tools that can significantly enhance project management for marketing...