


Just register for the free trial below and we will send you everything you need to evaluate QuickBooks Online including 30-day access, the full 76-page QuickBooks Online Guide (details everything that you can do in the software) plus the video training library. Free end-to-end consultation and support are included so if you need any help along the way, just let us know!


Paygration, Inc.
Customized email messages in QuickBooks Online make your communication more professional, consistent, and efficient. When your email messages are tailored to your brand’s identity, customers are more likely to take your business seriously when it reflects a professional image.
That said, we’ll show you how to properly set up messages in QuickBooks Online. We’ll also explain why it’s important to customize email messages.
Step 1: Navigate to Account and Settings
In the upper right corner of your dashboard, click the gear icon, and then select Account and settings. This will take you to the main settings page for your QuickBooks Online account.
If you would like to try the full version of QuickBooks Online Advanced, click here to get a free 30-day no-commitment trial plus access to the full video training library.
Step 2: Go to the “Sales” Tab
In the left-hand menu on the main settings page, click on the Sales tab to access the sales settings. From here, QuickBooks Online will display a number of sales settings, including sales form content, product and services, late fees, progress invoicing, and messages.
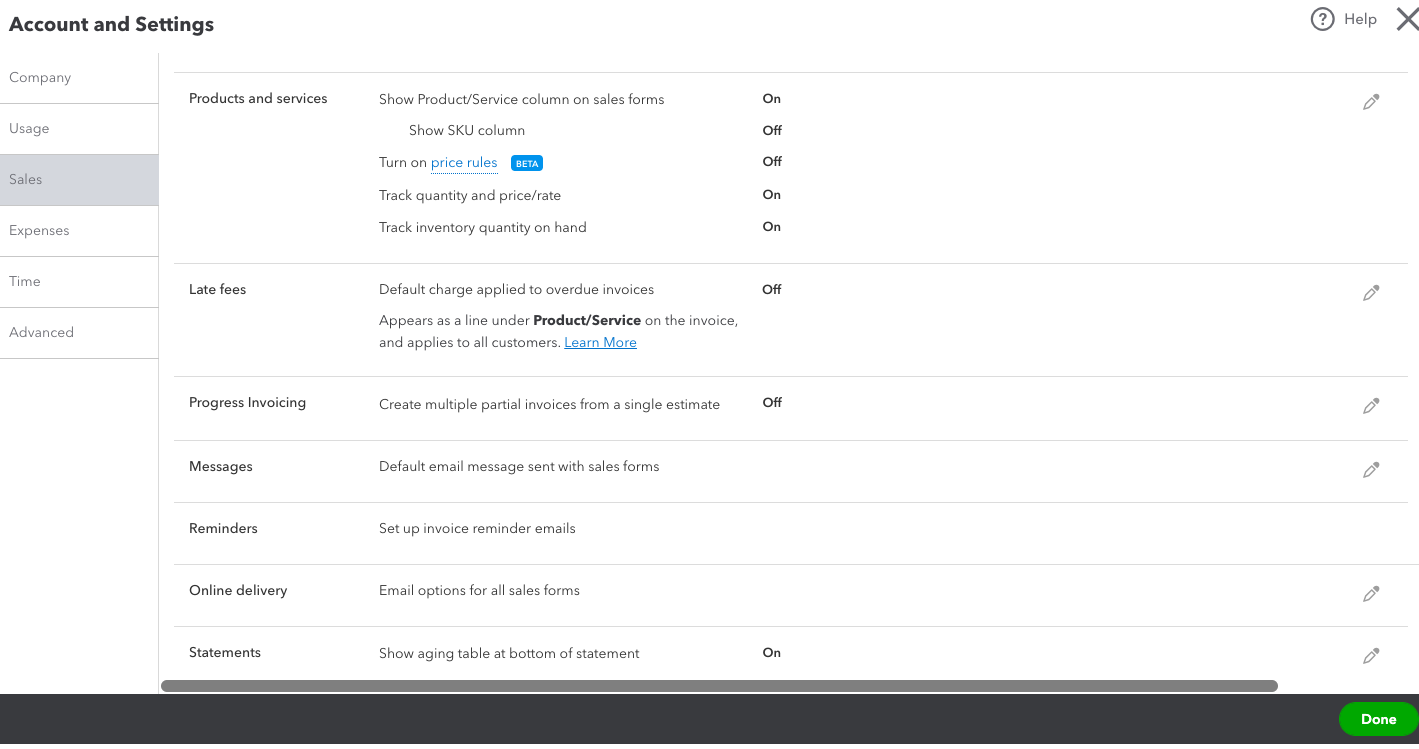
Sales settings in QuickBooks Online
Step 3: Customize Your Email Messages
In the Sales settings window, you’ll see a section labeled “Messages.” Here, you can customize different types of email messages. You can modify subject lines to clearly convey the purpose of the email, personalize the greeting to address your customers or clients by name, and craft the body of your email message, including all essential information such as transaction details or the message’s content.
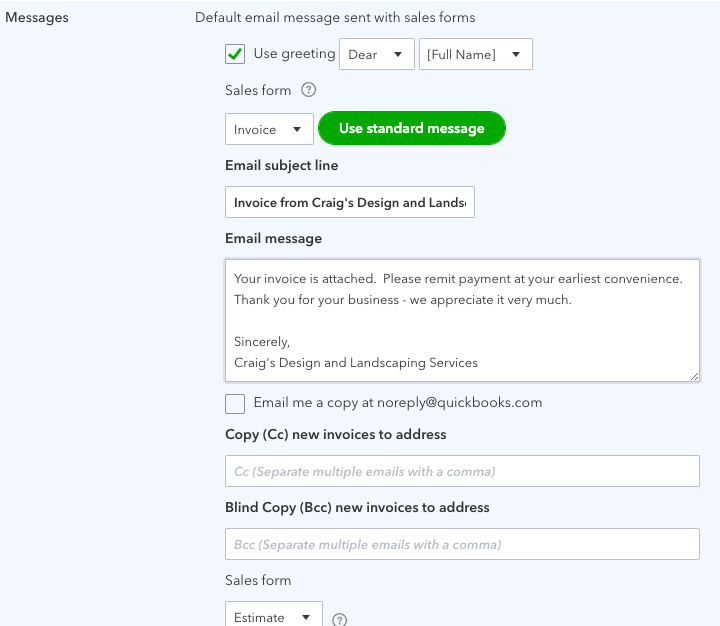
Customizing email messages in QuickBooks Online
Step 4: Save Your Changes
After customizing your email messages, click the Save button at the bottom of the settings page to apply the changes.
Step 5: Test Your Custom Email Messages
It’s a good practice to send a few test emails to yourself or a trusted colleague to ensure your email messages look and sound the way you intended. This step allows you to identify any issues or make further refinements if necessary.
Step 6: Start Using Your Custom Email Messages
Once you’ve confirmed that your custom email messages are working as expected, you can begin using them for various purposes, such as sending invoices, estimates, payment reminders, or any other correspondence related to your business operations.
Why Customize Email Messages?
- Professionalism: Custom email messages reflect professionalism, leaving a lasting impression on your customers, vendors, and associates.
- Brand Consistency: Consistency in branding is vital for reinforcing your company’s identity. Customized email templates ensure that your communication aligns with your brand’s visual and messaging guidelines, helping maintain a strong and recognizable brand presence.
- Personalization: Addressing your recipients by name and tailoring the content to their specific needs makes them feel valued and strengthens the connection between your business and its stakeholders.
- Clarity: Customized subject lines and message bodies provide recipients with a quick understanding of the email’s purpose and content.
- Time-Saving: Using predefined email templates can save you a significant amount of time, especially when sending routine emails like invoices, payment reminders, or order confirmations.
Wrap Up
By following the steps outlined in this guide, you can ensure that your email messages reflect your brand identity and meet your specific communication needs, ultimately strengthening your business relationships and boosting your professional image.
Share this post
Latest Posts
Post Categories
Categories
You May Also Like

Why QuickBooks Online Is a Game-Changer for Small Business Accounting
10/21/2025
For small business owners, managing finances can feel like a constant balancing act, trying to stay on...

Can I Use the QuickBooks Online Test Drive to Test integrations?
09/04/2024
QuickBooks Online can have a learning curve, especially for new users or businesses trying to integrate...

How Can I Contact QuickBooks Online Support?
09/03/2024
Navigating QuickBooks Online can sometimes be challenging, especially when issues arise that require...

How Much Does Each QuickBooks Online Plan Cost per Month?
09/02/2024
QuickBooks Online offers a range of subscription plans designed to meet the diverse needs of businesses...

QuickBooks Online Advanced vs Enterprise: A Detailed Comparison
08/15/2024
QuickBooks offers two robust solutions for businesses ready to step up from basic accounting software:...

QuickBooks Online vs Desktop: Differences & When to Use Each
08/12/2024
QuickBooks, a popular accounting software, offers two main versions: QuickBooks Online and QuickBooks...

Is There a Specific Time of the Month that's Best for Migrating to QuickBooks Online?
07/31/2024
Migrating to QuickBooks Online can be a transformative step for your business, offering improved accessibility,...

Can QuickBooks Online Integrate with My Point-of-Sale (POS) System?
07/29/2024
Efficient financial management requires seamless integration between your Point-of-Sale (POS) system...

Why Should I Migrate from QuickBooks Self-Employed to QuickBooks Online?
07/26/2024
Migrating from QuickBooks Self-Employed (QBSE) to QuickBooks Online (QBO) can significantly enhance your...

How Does QuickBooks Online Handle Sales Taxes?
07/25/2024
Managing sales tax is a crucial aspect of running a business. It can be complex and time-consuming, but...

Can I Import My Data From Another Accounting Software to QuickBooks Online?
07/25/2024
Transitioning to a new accounting software can seem daunting, especially when considering the need to...

How Does QuickBooks Online Help With Project Management for Marketing Agencies?
07/20/2024
QuickBooks Online offers a suite of tools that can significantly enhance project management for marketing...