Just register for the free trial below and we will send you everything you need to evaluate QuickBooks Enterprise including 30-day access, sample company files, and the full 88-page QuickBooks Enterprise Guide that details everything that you can do in the software. Free end-to-end consultation and support are included so if you need any help along the way, just let us know!

Paygration, Inc.
With the previous version of QuickBooks Enterprise, businesses had to use third-party solutions to track the expiration dates of inventory items. While custom fields could be customized to record dates, the reports were not tailored to track custom date fields chronologically, making them unable to track expiration dates.
Luckily, QuickBooks Enterprise 2023 has recently introduced a new feature that allows users to track expiration dates. In this article, we’ll discuss this new feature of QuickBooks Enterprise, how it works, and when it’s beneficial for businesses.
Expiration Date Tracking in QuickBooks Enterprise
QuickBooks Enterprise’s inventory expiration date tracking feature allows you to track the expiration dates of your inventory items, ensuring that you are not selling expired products to customers. You can set up alerts to remind yourself of upcoming expiration dates and take appropriate action to renew or replace items before they expire. In addition to adding expiration dates to lot or serialized products and tracking those dates in sales transactions, you can generate reports based on expiration dates.
If you would like to try the full version of QuickBooks Enterprise Desktop, click here to get a free, 30-day no-commitment trial plus access to the Resource Guide that lists all the features available in Enterprise.
Here’s how expiration date tracking works in QuickBooks Enterprise:
- Adding expiration dates: You can add an expiration date field to most purchase and sales forms, including invoices, bills, item receipts, credit memos, and credit memos.
- Setting up alerts: Once the expiration date is entered, you can set up alerts to remind yourself or your team when an item is about to expire. You can customize the alert frequency and choose to receive the alert via email, pop-up message, or report.
- Disposing of expired items: When an item is expired, you can dispose of it by updating the item record to indicate that it is no longer in stock. The system will prompt the user to confirm the disposal and provide a reason for the disposal.
- Reporting on expirations: QuickBooks Enterprise also allows you to run reports on expired items, including the Inventory Expiration Status Report, which lets you track expired and expiring lots/serials in one place. This report shows your inventory lot/serial numbers along with the expiration date and the days left before it expires. You can also customize your reports using filters for all items, already expired items, yet-to-expire items, and custom date ranges.
Who Should Use Inventory Expiration Date Tracking in Enterprise?
QuickBooks Enterprise’s inventory expiration date tracking feature is useful for businesses that deal with perishable items or products that have a limited shelf life. Here are some sample scenarios where this feature can be helpful:
- Food and Beverage: For businesses in the food and beverage industry, it is crucial to track expiration dates to prevent the sale of expired products. With QuickBooks Enterprise’s inventory expiration date tracking feature, you can easily set up alerts for expiring products, making it easy to identify and dispose of expired items before they are sold.
- Pharmaceuticals: In the pharmaceutical industry, it is essential to track the expiration dates of drugs to ensure their safety and efficacy. With expiration date tracking, you can monitor the expiration dates of their products and ensure that they are not sold after their expiration date.
- Cosmetics: Many cosmetics have a limited shelf life, and using expired cosmetics can be harmful to the skin. The new expiration date tracking feature helps you easily track the expiration dates of your cosmetics and avoid selling expired products to customers.
- Chemicals: Some businesses deal with chemicals that have a limited shelf life and can become hazardous if used after their expiration date. By tracking the expiration dates of these chemicals in QuickBooks Enterprise, you can ensure that you are using them safely and avoid any potential hazards.
How to Turn on Expiration Date Tracking in QuickBooks Enterprise
To use expiration date tracking, you need to make it mandatory to fill in serial/lot numbers. To activate this feature, click on Edit, select Preferences, then tap Items & Inventory. Click the Company Preferences tab, and then select Advanced Inventory Settings. Then, click on the Serial/Lot No. & Expiration tab. From here, you can also activate lot or serial numbers. This is very important because when you assign an expiration date, you assign it to a specific serial or lot number.
Click on the Activate Expiration date checkbox and select the transactions you want to track expiration dates.
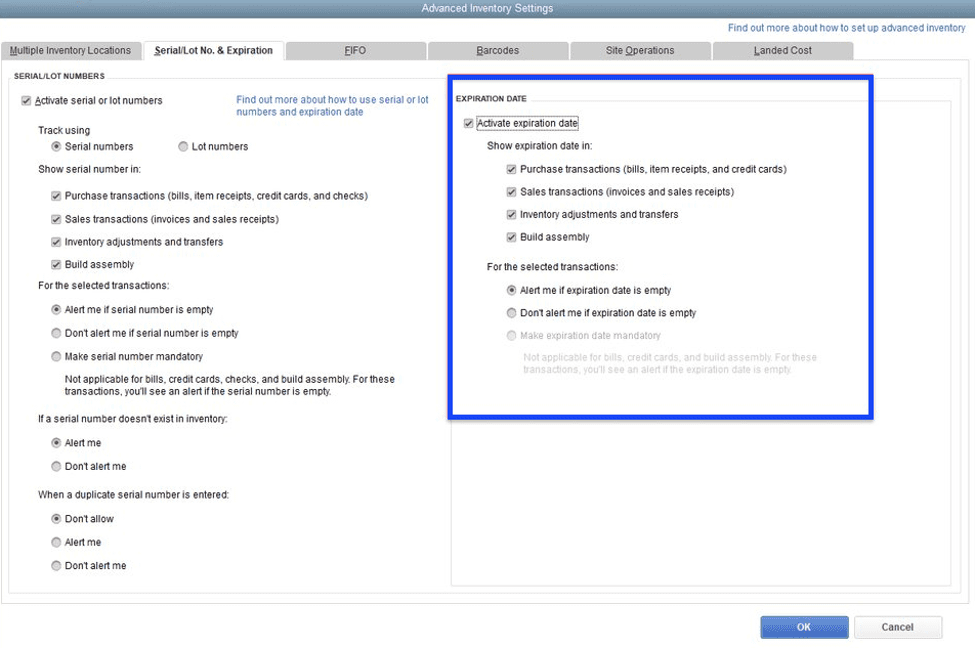
Activating Inventory Expiration Tracking in QuickBooks Enterprise
Once activated, you can run an Inventory Expiration Status Report to track expired and expiring lots/serialized items.
Bottom Line
QuickBooks Enterprise’s inventory expiration date tracking feature is an essential tool for businesses dealing with perishable items. By using this feature, businesses can avoid selling expired products, ensure customer safety, and comply with regulatory requirements.
Learn more about the other advanced inventory management features of QuickBooks Enterprise.
- advanced inventory in quickbooks enterprise diamondbuy quickbooks enterprisefield service management for quickbooks enterpriseinventory expiration tracking in QuickBooks Enterprisequickbooks enterprisequickbooks enterprise advanced inventoryquickbooks enterprise advanced reportingquickbooks enterprise diamondquickbooks enterprise inventoryquickbooks enterprise platinum

