


Just register for the free trial below and we will send you everything you need to evaluate QuickBooks Enterprise including 30-day access, sample company files, and the full 88-page QuickBooks Enterprise Guide that details everything that you can do in the software. Free end-to-end consultation and support are included so if you need any help along the way, just let us know!


If you are in the manufacturing business and you need to build items from other stock items—say a bike, you can use QuickBooks Desktop Enterprise to track separate items in builds without having to manually adjust inventory numbers. Simply put, you can use inventory assembly items in QuickBooks Online to build and track finished goods.
In this post, we’ll walk you through the steps on how to create assemblies in QuickBooks Desktop Enterprise.
However, before you can build assemblies in QuickBooks, you should first set up your products’ bill of materials. You can set up your bill of materials using an item called inventory assembly.
How to Set Up Your Product’s Bill of Materials
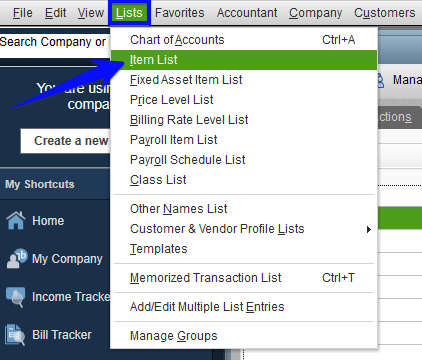
Go to Lists and select Item List, as shown below.
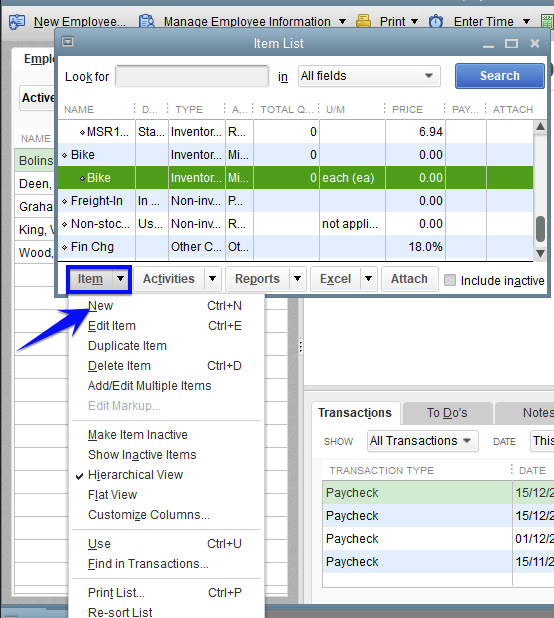
Next, click on the Item ▼ drop-down and then tap New. Select Inventory Assembly from the dropdown options.
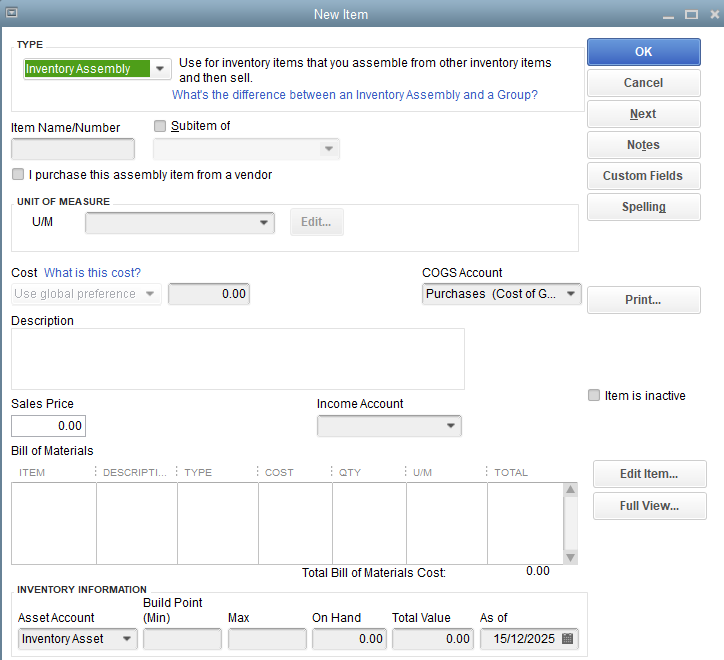
The inventory assembly form appears, where you’ll be asked to provide details such as the cost of all the parts in the bill of materials, product description, and sales price. Also, make sure to select Cost of Goods Sold under the COGS account. Complete all the fields and click on OK.
Now that you have created an item, you can start building product assemblies in QuickBooks Enterprise.
How to Create Product Assemblies in QuickBooks Enterprise
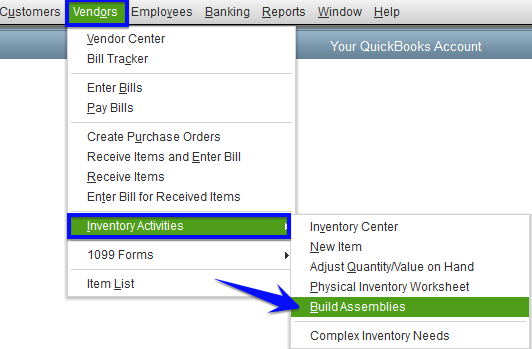
From your QuickBooks Desktop homepage, click on the Vendors menu, select Inventory Activities, and click on the Build Assemblies dropdown, as shown below.
Next, select the item you want to build from the Assembly Item dropdown. You can select the item that you have just created in the tutorial above. You can also add a new item on the fly.
The Build Assembly form appears which includes the fields you need to build your product.
Indicate the quantity to build and you can even add a memo if needed.
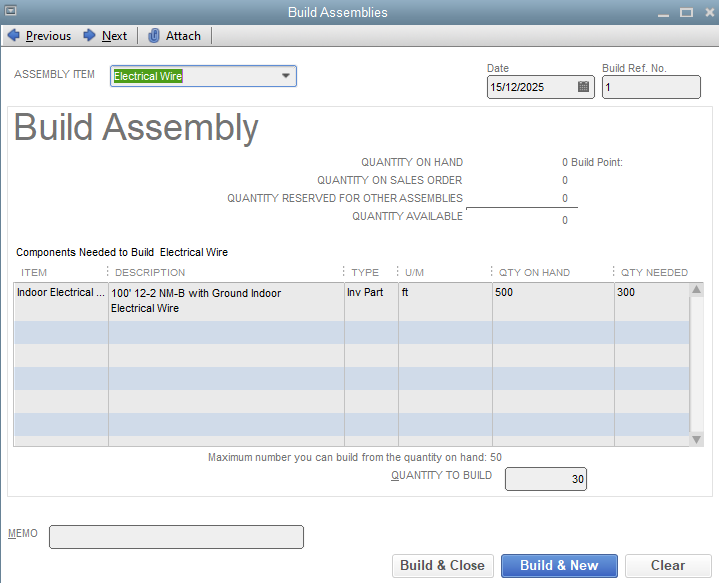
Once completed, click on Build and Close or Build and New.
The process of building assemblies in QuickBooks Enterprise may feel a little overwhelming at first, but when you get the hang of it, you should be able to master it easily.

Why Choose QuickBooks Desktop Enterprise for Growing Businesses in 2026
As small businesses expand, their accounting needs become more complex—and not every software can keep...

What Are the Key Features of QuickBooks Desktop Enterprise?
As businesses grow, so do their accounting needs. What worked well for a small team may start to feel...

Why QuickBooks Enterprise Desktop Silver Monthly Is Perfect for Growing Businesses?
For growing businesses, having the right accounting software is very important. Such software helps businesses...

Why is QuickBooks Enterprise Ideal for Mid to Large-Sized Businesses?
As your business expands, managing accounting, inventory, and operations with entry-level tools can create...

Top 10 Features of QuickBooks Enterprise in 2026
Managing thousands of transactions, tracking inventory across multiple locations, and ensuring team-wide...

Can QuickBooks Enterprise Handle Multiple Company Files?
Managing multiple company files can be a complex task, especially if you rely on various platforms to...

Can I Access QuickBooks Enterprise on a Mac?
QuickBooks Enterprise is a powerful accounting software solution designed to meet the needs of growing...

What Industries Is QuickBooks Enterprise Best Suited For?
QuickBooks Enterprise is a comprehensive accounting software solution that is designed to cater to the...

How Many Versions of QuickBooks Enterprise Are Available?
QuickBooks Enterprise is a powerful and versatile accounting software designed to cater to the needs...

Can a QuickBooks Reseller Help with QuickBooks Enterprise Installation and Setup?
Implementing QuickBooks Enterprise can be a game-changer for your business, but it can also be a daunting...

What Are the System Requirements for QuickBooks Enterprise?
Whether you are setting up QuickBooks Enterprise for the first time or upgrading to a new version, understanding...

Can QuickBooks Enterprise Be Accessed Remotely?
QuickBooks Enterprise can be accessed remotely through cloud hosting solutions. By leveraging cloud hosting,...