


Just register for the free trial below and we will send you everything you need to evaluate QuickBooks Online including 30-day access, the full 76-page QuickBooks Online Guide (details everything that you can do in the software) plus the video training library. Free end-to-end consultation and support are included so if you need any help along the way, just let us know!


In addition to its basic setup options, QuickBooks Online provides several advanced settings and time-saving features that help you customize the software to your exact business needs. From selecting the fiscal year and accounting method and customizing the chart of accounts to selecting currency options, these advanced settings are designed to help you improve your productivity and efficiency.
In this article, we’ll discuss the different advanced settings available in QuickBooks and how to set up each advanced feature within the program.
Navigate to the Advanced Tab. After logging in to your QuickBooks Online account, click on the gear icon in the upper right corner. From the dropdown menu, select Account and Settings. Within this section, you’ll find the Advanced tab, where you can access various advanced settings to customize your QuickBooks Online experience.
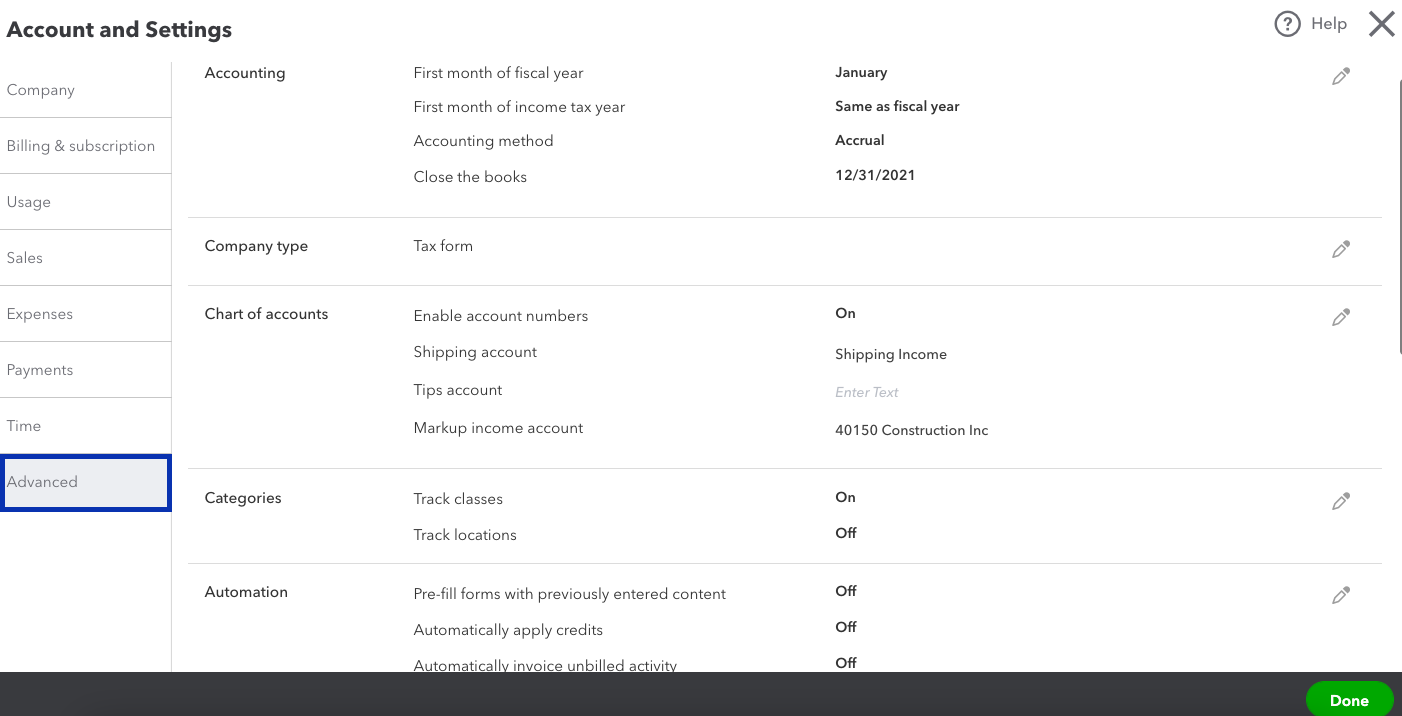
Navigating to the Advanced tab in QuickBooks Online
Start customizing your QuickBooks: From the Advanced tab, you’ll be able to access different advanced settings, such as accounting method selection, chart of accounts setup, and setting classes and locations.
- Company: Here, you can set your company’s fiscal year and choose your preferred accounting method, either cash or accrual. Ensure that these settings align with your business’s financial reporting requirements.
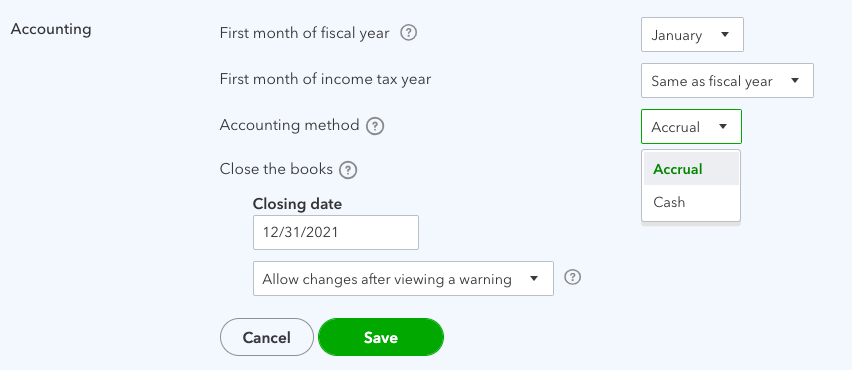
Setting up accounting preferences in QuickBooks
- Company type: In the “Company Type” section, specify the type of business you operate. This information helps QuickBooks Online tailor its features and settings to suit your industry and financial needs more effectively.
- Chart of accounts: One of the key setup options here is the ability to enable account numbers, which is particularly useful for accountants who prefer a structured organization. This allows users to assign specific numerical ranges to different types of accounts, such as revenue accounts starting at 1,000 and expense accounts starting at 2,000, making it easier to categorize and manage financial data.
Additionally, the section offers several income account customization options. You can specify which income account to use for tracking shipping income, discounts provided to customers, tips collected (as current liabilities until distributed to employees), markup income (if expenses are marked up and billed to customers), and billable expense income (treating customer expense reimbursements as income or expense reduction).
Learn more about the chart of accounts in QuickBooks Online.
- Categories: With QuickBooks Online Plus and Advanced, you’ll be able to use classes and locations. Classes in QuickBooks Online are used to categorize transactions and track different segments of your business, such as departments, product lines, or locations. By assigning transactions to specific classes, businesses can get a clearer picture of their financial performance across different segments. This is especially helpful for businesses with multiple divisions or projects, as it allows for more detailed reporting and analysis.
Locations are similar to classes but provide an additional level of categorization. Businesses can use locations to track financial data for different physical places or branches, making it ideal for companies with multiple office locations or stores. With locations, businesses can see how each branch is performing individually and in comparison to others.
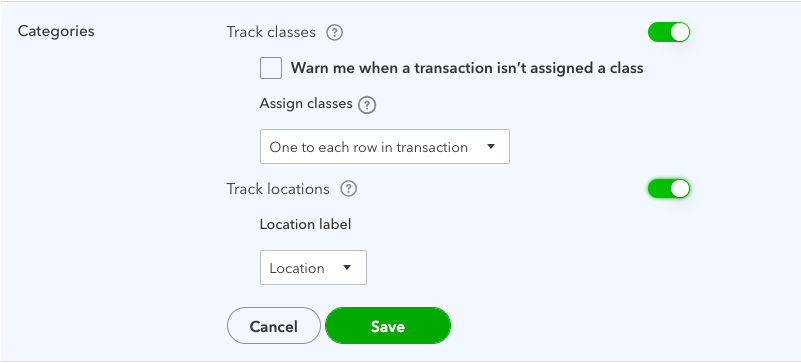
Setting up class and location tracking in QuickBooks Online
Explore class tracking and location tracking and when to use them.
- Automation: From here, you can enable various automation options to streamline your bookkeeping processes. For instance, you can set QuickBooks to automatically apply credits to your invoices and create invoices for customers with unbilled activities. Tailor these options to match your preferences and reduce manual data entry.
- Projects: If your business involves project-based work or you want to track income and expenses for specific jobs, enable the “Projects” feature. This setting allows you to create, manage, and analyze projects, providing valuable insights into project profitability.
- Currency: Here, you can enable multi-currency support and specify your home currency preference for accurate transaction handling. Note that once turned on, you can’t turn off the multi-currency setting.
- Business Network: You have the option to connect with other businesses, suppliers, or customers on the QuickBooks Business Network. Evaluate the benefits and decide if this feature aligns with your networking and collaboration goals
- Other Preferences: Here, you’ll find other preferences, such as the option to change date and number formats, customer labels, and automatically sign out if you’re inactive for a certain number of hours.
Congratulations! You’ve successfully explored and set up the essential advanced settings in QuickBooks Online. By customizing these features, you’ve unlocked the full potential of QuickBooks to streamline your accounting processes.

Why QuickBooks Online Is a Game-Changer for Small Business Accounting
For small business owners, managing finances can feel like a constant balancing act, trying to stay on...

Can I Use the QuickBooks Online Test Drive to Test integrations?
QuickBooks Online can have a learning curve, especially for new users or businesses trying to integrate...

How Can I Contact QuickBooks Online Support?
Navigating QuickBooks Online can sometimes be challenging, especially when issues arise that require...

How Much Does Each QuickBooks Online Plan Cost per Month?
QuickBooks Online offers a range of subscription plans designed to meet the diverse needs of businesses...

QuickBooks Online Advanced vs Enterprise: A Detailed Comparison
QuickBooks offers two robust solutions for businesses ready to step up from basic accounting software:...

QuickBooks Online vs Desktop: Differences & When to Use Each
QuickBooks, a popular accounting software, offers two main versions: QuickBooks Online and QuickBooks...

Is There a Specific Time of the Month that's Best for Migrating to QuickBooks Online?
Migrating to QuickBooks Online can be a transformative step for your business, offering improved accessibility,...

Can QuickBooks Online Integrate with My Point-of-Sale (POS) System?
Efficient financial management requires seamless integration between your Point-of-Sale (POS) system...

Why Should I Migrate from QuickBooks Self-Employed to QuickBooks Online?
Migrating from QuickBooks Self-Employed (QBSE) to QuickBooks Online (QBO) can significantly enhance your...

How Does QuickBooks Online Handle Sales Taxes?
Managing sales tax is a crucial aspect of running a business. It can be complex and time-consuming, but...

Can I Import My Data From Another Accounting Software to QuickBooks Online?
Transitioning to a new accounting software can seem daunting, especially when considering the need to...

How Does QuickBooks Online Help With Project Management for Marketing Agencies?
QuickBooks Online offers a suite of tools that can significantly enhance project management for marketing...