


Just register for the free trial below and we will send you everything you need to evaluate QuickBooks Online including 30-day access, the full 76-page QuickBooks Online Guide (details everything that you can do in the software) plus the video training library. Free end-to-end consultation and support are included so if you need any help along the way, just let us know!


Many users find themselves managing multiple companies or clients within the QuickBooks Online platform. If you’re in this situation, you’ll be pleased to know that QuickBooks Online allows you to seamlessly switch between different company files. In this article, we’ll guide you through the steps on how to switch between companies in QuickBooks Online.
You Can Add Multiple Companies in QuickBooks Online
QuickBooks Online allows you to add multiple companies and switch between them at any time. This feature is incredibly useful for accountants, bookkeepers, or business owners who need to access and manage several financial entities. However, note that each company requires a separate active subscription to QuickBooks Online.
How to Switch Between Companies in QuickBooks Online
- Step 1: Log in to QuickBooks Online. Begin by logging in to your QuickBooks Online account. Use your login credentials to access your primary company file.
- Step 2: Access the Dashboard: Once you’re logged in, you will be directed to the dashboard of your primary company. To switch to another company, click on the gear icon and then select Switch company under Profile.
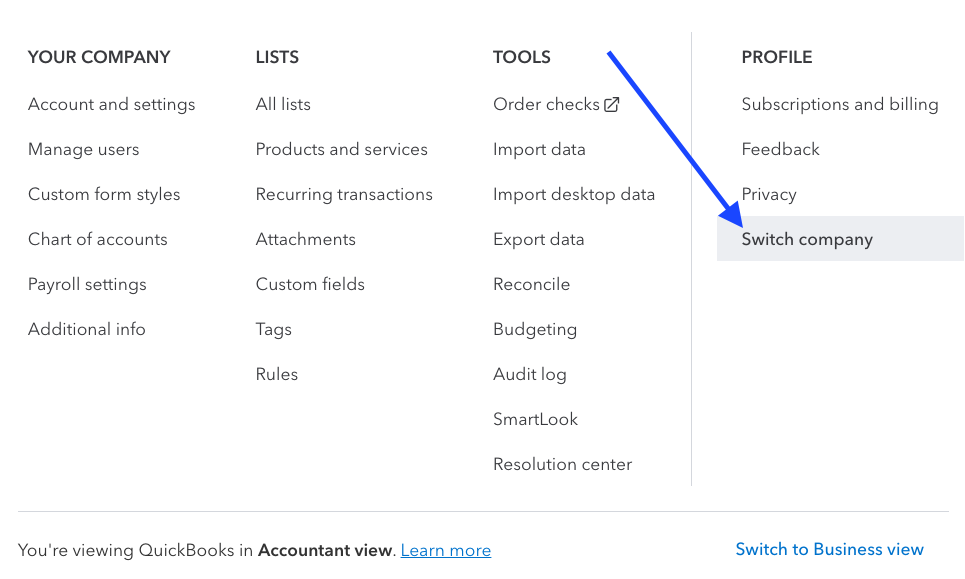
Switching between companies in QuickBooks Online
- Step 3: Choose a Company: QuickBooks Online will display a list of all the companies that you have access to, including those you own or those shared with you. Select the company you wish to switch to by clicking on its name.
- Step 4: Confirm Your Selection:
- After selecting the desired company, QuickBooks Online will ask you to confirm your choice. Make sure you’ve chosen the correct company, as switching will take you to a different set of financial data.
- Step 5: Begin Working in the New Company:
- Once you confirm your selection, QuickBooks Online will seamlessly transition to the company you’ve chosen. You can now start working with the financial data of the new company, just as you would with your primary one.
Tips and Considerations
Company Access: You must have the necessary permissions to access multiple companies in QuickBooks Online. If a company has shared access with you, make sure the owner has granted you the required privileges.
Different Subscription Plans: QuickBooks Online offers different subscription plans with varying levels of access and features. Ensure that your subscription plan allows you to work with multiple companies. If you need help choosing which plan is right for you, check out our guide on how to select the best QuickBooks Online version for your small business.
Data Separation: Each company’s financial data remains separate and secure. Be cautious not to mix up transactions or data when switching between companies.
User Roles: Assign appropriate user roles within each company to control who can access and modify financial data. This is particularly important if you have multiple team members working with different companies. If you need customizable user roles, we recommend upgrading to QuickBooks Online Advanced. Learn more about user roles and permissions in QuickBooks Online Advanced.
Wrap Up
Whether you’re handling various clients’ accounts or managing your own set of companies, QuickBooks Online allows you to seamlessly switch between them. By following the steps outlined in this guide and considering the tips and considerations provided, you can navigate between companies in QuickBooks Online efficiently.
2026 QuickBooks Online Company-Switching Screenshots
The screenshots below reflect the current 2026 QuickBooks Online interface so you can match each step to what you see on screen when you switch between QuickBooks Online companies.
Managing Multiple Companies in QuickBooks Online
QuickBooks Online keeps every business as its own separate company file, with its own chart of accounts, transactions, and reports. Switching between QuickBooks Online companies never merges that data, so the books for each entity stay isolated and secure.
A common question is “how many companies can I have in QuickBooks Online?” There is no hard cap on the number of companies tied to a single login, but each company file generally requires its own active QuickBooks Online subscription. You add more companies, not more businesses inside one subscription. For the full breakdown, see how many companies you can have in QuickBooks Online Advanced.
The benefit of company access from one login is speed. Instead of signing out and back in with separate credentials, you switch between company files in a couple of clicks while keeping each subscription billed and managed on its own.
This setup fits accountants and bookkeepers juggling several client books, consultants who manage finances for more than one business, and owners running multiple business entities such as a holding company plus its subsidiaries. Tightening user permissions in QuickBooks Online Advanced keeps each team member limited to the companies they should touch.
Related QuickBooks Online User Management Guides
Before you invite teammates into more than one company, it helps to get user access right. Learn how to add or edit users in QuickBooks Online so each person sees only the companies and tasks they need.
Frequently Asked Questions
How many companies can I have in QuickBooks Online?
There is no fixed limit on how many companies you can link to one QuickBooks Online login, but each company file needs its own active subscription. Many accountants and multi-entity owners manage several companies this way and switch between them from a single account.
Do I need a separate subscription for each QuickBooks Online company?
Yes. Each separate company file in QuickBooks Online generally requires its own paid subscription. One login can hold multiple companies, but the billing and plan level are set per company.
Why can’t I switch between companies in QuickBooks Online?
Usually it comes down to access rights. You can only switch into companies where you have been added as a user or accountant. If a company is missing from your Switch company list, ask the company owner to grant your login the proper permissions.
Can multiple users switch between companies?
Yes. Any user who has been invited to more than one company can switch between those companies from their own login, as long as their permissions allow access to each one.
Can accountants manage multiple QuickBooks Online companies from one login?
Yes. Accountants and bookkeepers can hold access to many client companies under one login and switch between QuickBooks Online companies without separate sign-ins, which is one of the main reasons firms rely on this feature.
2026 Update: Switching Between Companies in QuickBooks Online
QuickBooks Online continues to support switching between eligible company accounts from a single login in 2026. The Switch company option still lives under the profile and gear menus, so the steps in this guide remain current.
Access depends on user permissions and company access rights. A login only shows the companies it has been granted, so any change in roles can change which companies appear in your list.
Businesses managing multiple entities should review user permissions and account access periodically. A quick audit each quarter keeps QuickBooks Online company access aligned with who actually needs each set of books.

Why QuickBooks Online Is a Game-Changer for Small Business Accounting
For small business owners, managing finances can feel like a constant balancing act, trying to stay on...

Can I Use the QuickBooks Online Test Drive to Test integrations?
QuickBooks Online can have a learning curve, especially for new users or businesses trying to integrate...

How Can I Contact QuickBooks Online Support?
Navigating QuickBooks Online can sometimes be challenging, especially when issues arise that require...

How Much Does Each QuickBooks Online Plan Cost per Month?
QuickBooks Online offers a range of subscription plans designed to meet the diverse needs of businesses...

QuickBooks Online Advanced vs Enterprise: A Detailed Comparison
QuickBooks offers two robust solutions for businesses ready to step up from basic accounting software:...

QuickBooks Online vs Desktop: Differences & When to Use Each
QuickBooks, a popular accounting software, offers two main versions: QuickBooks Online and QuickBooks...

Is There a Specific Time of the Month that's Best for Migrating to QuickBooks Online?
Migrating to QuickBooks Online can be a transformative step for your business, offering improved accessibility,...

Can QuickBooks Online Integrate with My Point-of-Sale (POS) System?
Efficient financial management requires seamless integration between your Point-of-Sale (POS) system...

Why Should I Migrate from QuickBooks Self-Employed to QuickBooks Online?
Migrating from QuickBooks Self-Employed (QBSE) to QuickBooks Online (QBO) can significantly enhance your...

How Does QuickBooks Online Handle Sales Taxes?
Managing sales tax is a crucial aspect of running a business. It can be complex and time-consuming, but...

Can I Import My Data From Another Accounting Software to QuickBooks Online?
Transitioning to a new accounting software can seem daunting, especially when considering the need to...

How Does QuickBooks Online Help With Project Management for Marketing Agencies?
QuickBooks Online offers a suite of tools that can significantly enhance project management for marketing...