


Just register for the free trial below and we will send you everything you need to evaluate QuickBooks Online including 30-day access, the full 76-page QuickBooks Online Guide (details everything that you can do in the software) plus the video training library. Free end-to-end consultation and support are included so if you need any help along the way, just let us know!


One important feature of QuickBooks Advanced is the ability to assign user roles and permissions to different users, which allows for greater control over access to sensitive financial information. This guide walks through user roles and permissions in QuickBooks Online Advanced and how to set them up, so each team member gets the access they need while sensitive financial data stays protected.
Today, we’ll discuss user roles and permissions in QuickBooks Online Advanced, some sample scenarios where they can be useful, and how to set them up in QuickBooks.
What are User Roles and Permissions in QuickBooks Advanced?
User roles and permissions in QuickBooks Advanced are essentially access controls that limit the amount of information a user can view, edit or delete within the software. QuickBooks Advanced has predefined user roles that can be assigned to users, or customized roles can be created to meet specific needs. Each role has a set of permissions associated with it, which can be used to limit a user’s access to particular areas of the software.
Some of the permissions that can be assigned include access to banking and credit card accounts, the ability to view financial reports, the ability to create, edit, and delete invoices, and access to payroll and employee data. These permissions can be granted or denied based on the specific needs of the user and the security requirements of the business.
How User Roles and Permissions Work in Advanced
User roles and permissions work by assigning a role to each user, which determines the level of access they have to data and features within the software. Each role has a set of permissions associated with it, which determine the specific actions that a user can take within the software.
For example, the administrator role in QuickBooks Advanced has access to all features and data within the software, while the sales representative role may only have access to specific sales-related features. Additionally, businesses can create custom roles tailored to their specific needs, allowing them to fine-tune access controls based on their unique requirements.
When to Set up User Roles and Permissions?
- Multiple users: If you have multiple users working on the same QuickBooks Advanced account, it’s important to ensure that each user has access only to the information they need to do their job. By assigning user roles and permissions, you can control who has access to sensitive financial data and prevent unauthorized access.
- Outsourced accounting: If you outsource your accounting to a third-party service provider, you can use user roles and permissions to restrict access to your financial data. For example, you might give your accounting firm access to your accounts receivable (A/R) and accounts payable (A/P) data but restrict access to your bank accounts and payroll information.
- Departmental access: If you have multiple departments within your organization, you can use user roles and permissions to restrict access to financial data based on department. For instance, you might give your sales team access to customer data but limit access to your financial statements.
- Employee access: If you have employees who need access to your QuickBooks Advanced account, you can use user roles and permissions to restrict their access to sensitive financial data. As an example, you might give your sales team access to customer data but restrict access to your bank accounts and payroll information.
- Audit trail: By assigning user roles and permissions, you can create an audit trail of who accessed what data and when. This can be useful in case of any suspicious activity or when an audit is being performed.
How to Set up User Roles and Permissions in QuickBooks Advanced?
Setting up user roles and permissions in QuickBooks Advanced is easy with the following steps:
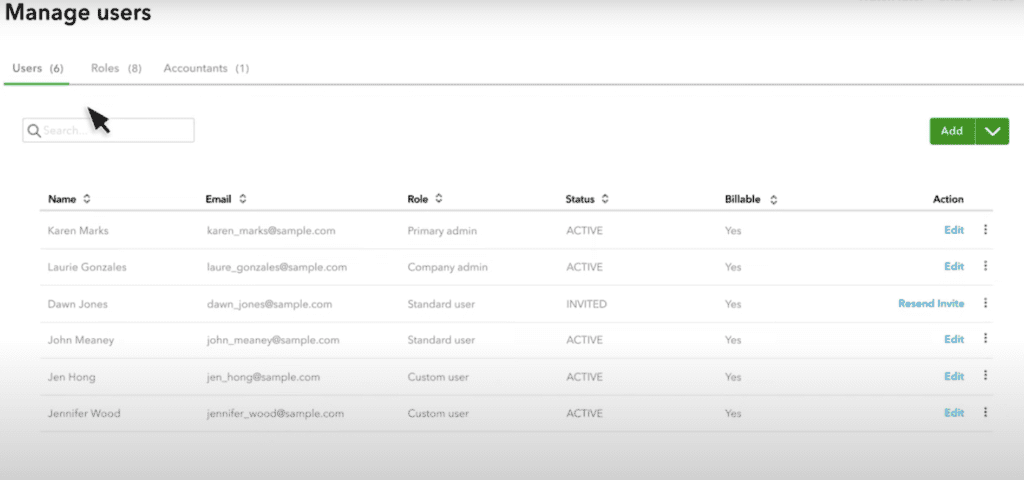
- First, click on the cog wheel icon on the upper right-hand corner of the screen and then select Manage Users under Your Company. The Manager Users screen includes three tabs: Users, Roles, and Accountants. The User tab allows you to create a new user, while the Roles tab lets you decide what a specified user can see and do in QuickBooks. The Accountants tab allows you to invite your accountant or accounting firm to access your books.
When setting up a new role, you need to select the name and add a description. Then, select the role from the dropdown list. For instance, click the Sales checkbox to give a user full access to all your sales transactions. If you need to customize access to a specific sales transaction, click anywhere on the grayed area in the Sales section, and you’ll see a list of sales transactions that you can allow the user to access, including invoices and estimates.
Note that you need to be an administrator to be able to set up users and customize roles.

Bottom Line
Overall, user roles and permissions in QuickBooks Advanced are an important feature since they provide businesses with greater control over their financial data. By setting up custom permissions for each of your staff, you can prevent unauthorized access and ensure compliance with regulatory requirements.
In addition to user roles and permissions, QuickBooks Online Advanced has other outstanding features to simplify your business processes. Read our article on the top 10 advantages of QuickBooks Advanced to learn more.
A Closer Look at the QuickBooks Online Advanced User Management Interface (2026)
The screenshots below reflect the current QuickBooks Online Advanced interface for setting up quickbooks online advanced user permissions. Use them alongside the steps above to see exactly where each role-based access control lives. Every business owner managing more than one team member should review these screens, since the user role configuration options have expanded over recent releases.

User Management dashboard in QuickBooks Online Advanced, where admins add users and open the Roles tab.
From the Manage Users dashboard you can see who has access, what role each person holds, and the status of any pending invitations. This is the starting point for all user access management in QuickBooks Online Advanced.
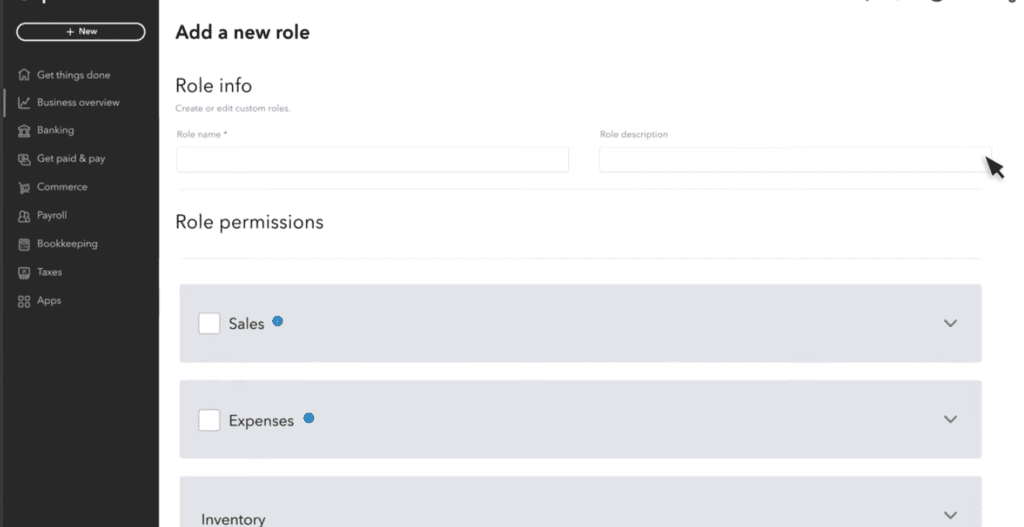
The custom roles screen is where QuickBooks Online Advanced pulls ahead of lower tiers. Instead of picking from a short fixed list, you build role-based access controls that match how your team actually works, granting view, edit, or full access per area.

Inside each role you can drill into a single transaction type. For example, granting access to invoices and estimates while keeping bank registers off limits. These permission-based workflows keep sensitive financial data visible only to the people who need it.

When you assign a role to a user, QuickBooks sends an email invitation. The user access assignment screen lets you change someone’s role at any time as responsibilities shift, which is part of why reviewing access regularly matters. For step-by-step help adding people, see our guide on how to add or edit users in QuickBooks Online.
QuickBooks Online Plus vs Advanced User Roles Comparison
If you’re weighing the two plans, the biggest difference is how much control you get over user access. QuickBooks Online Plus offers preset roles only, while Advanced adds fully custom roles and granular permissions. The table below breaks down where Advanced gives you stronger permission management. For the full feature breakdown, read our complete QuickBooks Online Plus vs Advanced guide.
| Capability | QuickBooks Online Plus | QuickBooks Online Advanced |
|---|---|---|
| Number of Users Supported | Up to 5 billable users | Up to 25 billable users |
| Custom User Roles | Preset roles only | Fully custom roles you create and name |
| Granular Permissions | Limited, area-level only | Per-transaction view, edit, and full access |
| Workflow Approvals | Not available | Custom approval workflows included |
| Administrative Controls | Standard admin role | Expanded admin and audit-log controls |
| Team Management Capabilities | Basic user list | Role-based team access management |
| Security Flexibility | Restricts access by broad area | Restricts access down to the transaction level |
| User Access Customization | Minimal | Extensive, role-by-role configuration |
QuickBooks Online Advanced offers stronger permission management than Plus, with custom roles, granular permissions, and approval workflows that Plus does not include.
For growing teams, that added flexibility is the main reason to choose Advanced. You can match QuickBooks online advanced roles to real job functions instead of forcing everyone into a handful of preset templates. Ready to upgrade? You can buy a QuickBooks Online Advanced monthly subscription and start configuring roles right away.
2026 Update: User Roles and Permissions in QuickBooks Online Advanced
User roles and permissions in QuickBooks Online Advanced continue to evolve, with Intuit periodically adding finer access controls and new areas you can restrict. Because of that, it’s worth treating permissions as something you review, not set once and forget.
A good habit is to audit your roles whenever someone changes jobs, joins, or leaves, and at least once or twice a year regardless. Confirm each person still has only the QuickBooks online advanced user permissions their work requires. For businesses that need custom access controls, Advanced remains the most flexible QuickBooks Online plan, which is why it stays the recommended choice for teams that have outgrown the preset roles in Plus.
Frequently Asked Questions
What user roles are available in QuickBooks Online Advanced?
QuickBooks Online Advanced includes predefined roles such as admin, standard user, and reports-only access, plus the ability to build fully custom roles. You can tailor each role to the exact areas a team member needs, which is the core of QuickBooks user roles in the Advanced plan.
Can I create custom user permissions in QuickBooks Online Advanced?
Yes. Advanced lets administrators create custom user permissions and assign view, edit, or full access for each section like Sales, Expenses, and Reports. These role-based access controls let you restrict sensitive financial data while still giving people the tools they need.
What is the difference between user roles in QuickBooks Online Plus and Advanced?
QuickBooks Online Plus offers preset roles with limited, area-level control, while QuickBooks Online Advanced adds custom roles, granular per-transaction permissions, and approval workflows. In short, Advanced provides far stronger permission management and user access customization than Plus.
How many users can access QuickBooks Online Advanced?
QuickBooks Online Advanced supports up to 25 billable users, compared with up to 5 in QuickBooks Online Plus. That higher limit, combined with custom QuickBooks team permissions, makes Advanced suited to larger and growing teams.
Why are custom permissions important for growing businesses?
As teams grow, more people touch your books, which increases the risk of errors or unauthorized access. Custom permissions and QuickBooks Online security controls let you give each person only what they need, protecting sensitive data and supporting compliance through permission-based workflows.

Why QuickBooks Online Is a Game-Changer for Small Business Accounting
For small business owners, managing finances can feel like a constant balancing act, trying to stay on...

Can I Use the QuickBooks Online Test Drive to Test integrations?
QuickBooks Online can have a learning curve, especially for new users or businesses trying to integrate...

How Can I Contact QuickBooks Online Support?
Navigating QuickBooks Online can sometimes be challenging, especially when issues arise that require...

How Much Does Each QuickBooks Online Plan Cost per Month?
QuickBooks Online offers a range of subscription plans designed to meet the diverse needs of businesses...

QuickBooks Online Advanced vs Enterprise: A Detailed Comparison
QuickBooks offers two robust solutions for businesses ready to step up from basic accounting software:...

QuickBooks Online vs Desktop: Differences & When to Use Each
QuickBooks, a popular accounting software, offers two main versions: QuickBooks Online and QuickBooks...

Is There a Specific Time of the Month that's Best for Migrating to QuickBooks Online?
Migrating to QuickBooks Online can be a transformative step for your business, offering improved accessibility,...

Can QuickBooks Online Integrate with My Point-of-Sale (POS) System?
Efficient financial management requires seamless integration between your Point-of-Sale (POS) system...

Why Should I Migrate from QuickBooks Self-Employed to QuickBooks Online?
Migrating from QuickBooks Self-Employed (QBSE) to QuickBooks Online (QBO) can significantly enhance your...

How Does QuickBooks Online Handle Sales Taxes?
Managing sales tax is a crucial aspect of running a business. It can be complex and time-consuming, but...

Can I Import My Data From Another Accounting Software to QuickBooks Online?
Transitioning to a new accounting software can seem daunting, especially when considering the need to...

How Does QuickBooks Online Help With Project Management for Marketing Agencies?
QuickBooks Online offers a suite of tools that can significantly enhance project management for marketing...