


From expense tracking and categorization to automated workflows and advanced reporting, QuickBooks Online Advanced helps businesses track, categorize, and manage their expenses effectively. In this article, we’ll explain the employee expense management feature of QuickBooks Online Advanced, how it works, and how it can benefit your company.
What is Employee Expense Management in QuickBooks Online?
Employee expense management allows your employees to enter their expenses into QuickBooks Online. They can input details such as date, vendor, amount, and expense category, ensuring all necessary information is captured. Additionally, employees have the option to attach digital receipts directly to their expense entries, eliminating the need for physical paperwork. Once the expenses and receipts are submitted, managers or designated approvers can access the expense entries, review the details, and verify the details of the expenses.
Employee Expense Management Key Features
Expense Categorization
When your employees submit their expenses in QuickBooks Online, they can assign a category to each expense transaction. These categories can be customized to align with the specific needs and structure of the business. Examples of expense categories include travel expenses, office supplies, meals and entertainment, or professional services.
By categorizing expenses, you can gain a clear understanding of where your money is being spent and allocate costs accurately to different departments or projects. This information is crucial for budgeting, forecasting, and making informed financial decisions.
Learn how QuickBooks Online Advanced can accelerate expense tracking and invoicing.
Receipt Capture and Attachment
With QuickBooks Online Advanced, you can capture and attach receipts to expense transactions. You can either upload digital receipts or use the QuickBooks mobile app to snap pictures of paper receipts, keeping all your expense-related information in one place. Your employees can upload digital receipts directly from their devices. This could include receipts received via email, PDFs, or any other digital format. The app automatically syncs the images with your QuickBooks account, making it easy to attach them to the relevant expense transactions.
Bank Reconciliation
Expense management in QuickBooks Online Advanced integrates with your bank accounts, making it easy to reconcile your expenses with your bank statements. You can match imported expenses with corresponding transactions in your bank feed, ensuring that all your expenses are accurately recorded and accounted for.
Reporting and Analytics
You can generate expense reports that provide insights into your spending trends, vendor expenses, and expense categories. In addition to basic expense reports, QuickBooks Online Advanced has a custom report builder that lets you create customized reports, including expense by category reports, expense by vendor reports, and expense by project or job reports. Learn more about QuickBooks Online Advanced’s custom report builder.
User Permissions and Approval Workflows
QuickBooks Online Advanced allows you to set user permissions and establish approval workflows for expenses. You can control who can enter, edit, or approve expense transactions, ensuring proper oversight and adherence to your internal controls.
Overall, expense management in QuickBooks Online Advanced streamlines the process of recording, categorizing, and analyzing expenses, providing businesses with a comprehensive toolset for effective expense tracking and financial management.
How to Manage Employee Expenses In QuickBooks Online Advanced
Setting up Team Members
First, you need to set up a team member so that they can submit expenses with receipts and track and record their expenses. On your QuickBooks dashboard, click on Expenses on the left menu bar, select Expense Claims, and tap Manage settings. Then, select which employees can submit expenses by clicking Manager users on the Manage settings screen.
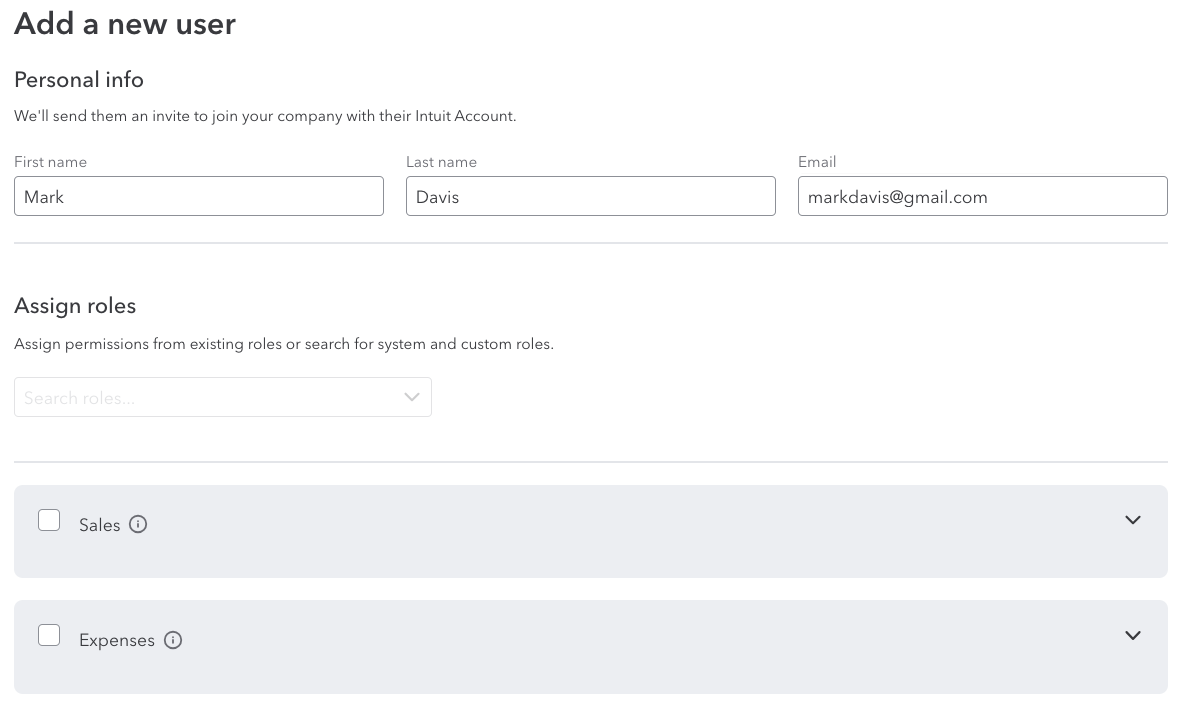
Setting up a new team member in QuickBooks Online Advanced
Enter the name of the user and their contact details, and assign their roles or create custom ones. You can also remove existing users if needed.
Setting up Categories
Once your team members are set up, you need to set up the categories that they can use to submit their expenses. Simply choose from categories on the dropdown list (i.e., equipment rental, automobile, advertising, etc.}. Then enter a nickname which is the name they will see when they submit their expenses.
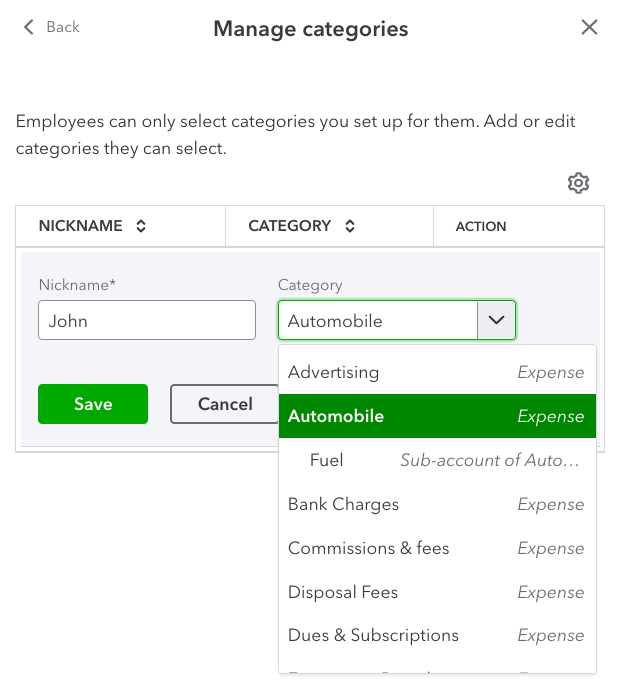
Setting up new expense categories in QuickBooks Online Advanced
Once the users and categories are set up, they will be able to submit their expenses and upload receipts into QuickBooks Online. As an admin, you will be notified when there’s a new expense to review. You can find the expenses waiting for review and expenses you’ve already reviewed on the Expenses Claims tab of the Expense menu.
For more detailed instructions on how to manage expenses in QuickBooks Online Advanced, watch the video below.
Bottom Line
QuickBooks Online Advanced’s powerful employee expense management feature enhances efficiency, transparency, and accuracy in the expense submission and review process. It provides a user-friendly platform for employees to submit their expenses and upload receipts while helping managers effectively review and approve expenses.


