


Just register for the free trial below and we will send you everything you need to evaluate QuickBooks Online including 30-day access, the full 76-page QuickBooks Online Guide (details everything that you can do in the software) plus the video training library. Free end-to-end consultation and support are included so if you need any help along the way, just let us know!


QuickBooks Online’s bill management features offer a convenient and efficient way to add and pay bills, allowing you to keep track of your accounts payable (A/P). By using QuickBooks’ tools for bill entry, categorization, automation, and reporting, you can gain better control over your A/P process and contribute to the financial health and success of your business.
In this article, we will guide you through the process of adding and paying bills in QuickBooks Online. We will also share some tips and best practices for effective bill management in QuickBooks.
Understanding Bills in QuickBooks Online
Before diving into the steps of adding and paying bills, it’s essential to understand the concept of bills within the QuickBooks Online ecosystem. A bill in QuickBooks Online represents the amount of money you owe to a vendor or supplier for goods or services received. Bills allow you to track your financial obligations and ensure timely payments, avoiding late fees or penalties.
Adding Bills in QuickBooks Online
- Navigate to the Expenses Menu: From your QuickBooks Online account, navigate to the Expenses menu on the left-hand side of the screen, and then click on Bills. This will take you to the bills dashboard.
- Select Add bill: On the bills dashboard, locate and click the Add bill button. This will open up the bill entry form, as shown below.

Bill entry form in QuickBooks
- Enter Vendor Information: In the Choose a vendor field, start typing the name of the vendor to whom you owe money. QuickBooks Online will search your vendor list and provide suggestions. Select the appropriate vendor. You may also add a new vendor if needed.
- Enter Bill Details: Enter the bill details, including the bill date, due date, and the amount owed. You can also assign the bill to a specific category or account. If the bill includes multiple items or expenses, you can itemize them by completing the Item details section. Enter each item’s details, such as description, quantity, rate, and account.
- Save and Close: Once you have entered all the necessary information, click the Save button to record the bill. It will now appear in your bills list. If you wish to set a future payment date for the bill, click on Save and schedule payment.
Paying Bills by Check in QuickBooks Online
Once you’ve added the bills to QuickBooks Online, the next step is to pay them. You can pay the bill either by check or electronically. To pay by check, follow the steps below.
- Select Pay Bills: Click on +New at the top of your QuickBooks Online dashboard and then select Pay bills.
- Select the bill to pay: QuickBooks will display the list of your outstanding bills. Mark the checkbox next to the bills you wish to pay.
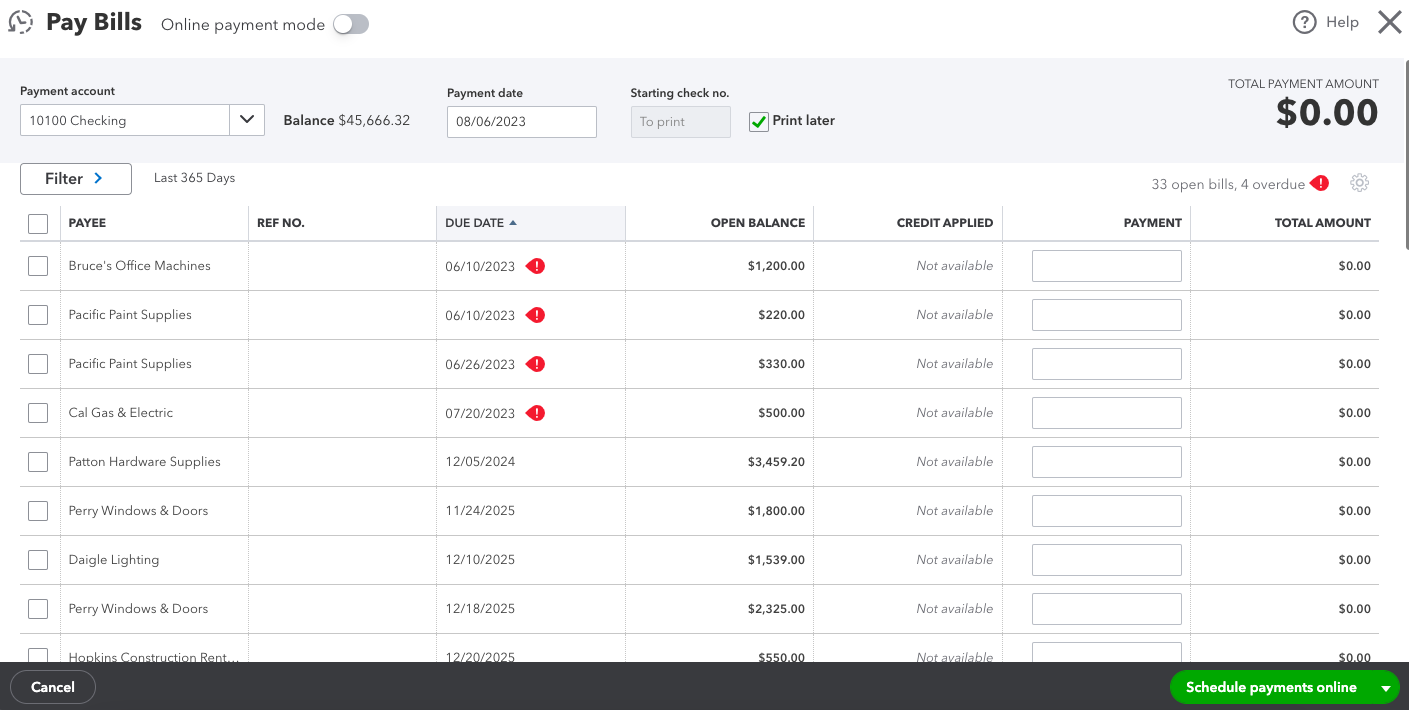
Paying bills by check in QuickBooks Online
- Complete the Pay Bills screen: Next, provide the required details, such as the payment account that you want to use to make the payment, the payment data, and the starting check number.
- Pay the bills: Next, locate the Save and print button and get ready to print the check.
Paying Bills Electronically in QuickBooks Online
- Select Pay Bills Online: Again, click on +New at the top of your QuickBooks Online dashboard and then select Pay bills online.
- Select the bills to pay: Place a checkmark next to the bill you wish to pay, just like you’ve done earlier.
- Enter the payment details: Provide the requested details, including the payment method, funds deduction date, and estimated payment delivery.
- Submit payment: Finally, click the Submit payment button
Tips for Effective Bill Management in QuickBooks
To make the most of QuickBooks Online’s bill management capabilities, consider these tips:
- Regular Updates: Enter bills and payments into QuickBooks Online regularly to maintain accurate and up-to-date financial records.
- Document Storage: Attach relevant documents, such as invoices or receipts, to bills for easy reference.
- Categorization: Properly categorize expenses to ensure accurate reporting and tax filing.
- Reconciliation: Regularly reconcile your bank and credit card accounts with QuickBooks Online to ensure your records match your actual financial transactions.
- Training: Invest time in learning how to use QuickBooks Online effectively through tutorials, webinars, or online courses.
By understanding the process of adding and paying bills and by following best practices, you can harness the power of QuickBooks Online to streamline your financial operations and make informed decisions for your business’s success. Remember, efficient bill management is a crucial component of maintaining a healthy and thriving business.

Why QuickBooks Online Is a Game-Changer for Small Business Accounting
For small business owners, managing finances can feel like a constant balancing act, trying to stay on...

Can I Use the QuickBooks Online Test Drive to Test integrations?
QuickBooks Online can have a learning curve, especially for new users or businesses trying to integrate...

How Can I Contact QuickBooks Online Support?
Navigating QuickBooks Online can sometimes be challenging, especially when issues arise that require...

How Much Does Each QuickBooks Online Plan Cost per Month?
QuickBooks Online offers a range of subscription plans designed to meet the diverse needs of businesses...

QuickBooks Online Advanced vs Enterprise: A Detailed Comparison
QuickBooks offers two robust solutions for businesses ready to step up from basic accounting software:...

QuickBooks Online vs Desktop: Differences & When to Use Each
QuickBooks, a popular accounting software, offers two main versions: QuickBooks Online and QuickBooks...

Setting Up Recurring Billing in QuickBooks for Hassle-Free Payments
Recurring billing is a powerful feature in QuickBooks that allows businesses to automate their invoicing...

Is There a Specific Time of the Month that's Best for Migrating to QuickBooks Online?
Migrating to QuickBooks Online can be a transformative step for your business, offering improved accessibility,...

Can QuickBooks Online Integrate with My Point-of-Sale (POS) System?
Efficient financial management requires seamless integration between your Point-of-Sale (POS) system...

Why Should I Migrate from QuickBooks Self-Employed to QuickBooks Online?
Migrating from QuickBooks Self-Employed (QBSE) to QuickBooks Online (QBO) can significantly enhance your...

How Does QuickBooks Online Handle Sales Taxes?
Managing sales tax is a crucial aspect of running a business. It can be complex and time-consuming, but...

Can I Import My Data From Another Accounting Software to QuickBooks Online?
Transitioning to a new accounting software can seem daunting, especially when considering the need to...